Dealing With Dew
by Jeffrey L. Polston (October 24, 1999)
It happens to the best of us. Our telescopes are setup. Our charts are laid out. We're cruising from one object to the next. It's a beautiful night. The sky is crystal clear and all the stars are calling your name. But slowly, something begins to happen. You notice that the view through the telescope is not quite as good as it was at the start of the evening. The brighter objects like stars have a hazy look to them while deepsky objects seem to disappear. You glance through the finder scope to make sure you are still pointed in the right direction. But even the images through the finder look dim. What's going on? A quick look at your optics will confirm your suspicions. Yes my friend, you've got dew.
Your finder scope objective, your eyepieces, and the corrector plate of your Schmidt-Cassegrain telescope are all covered with a milky looking layer of moisture. Dew can ruin a night's observing session quicker than about anything else. With dew, either you get rid of it or you can't use your equipment for the rest of the evening.
What is dew?
Dew is water that condenses from water vapor in warm air onto cool objects. There can only be a certain amount of water vapor in air at a given temperature. As the temperature falls the amount of water vapor that can be held also falls. As the air cools beyond the point of being fully saturated, the excess water vapor will condense onto the surface of any cool object. Objects that are exposed to the night sky, such as the corrector plate of a Schmidt-Cassegrain telescope, will cool down rapidly and eventually reach a point at which dew will form. The temperature at which dew forms is known as the dew point. If the dew point happens to be below the freezing point of water, then frost will form.
Fighting dew
Some people use little "hot" air blowers to rid their optics of dew. These 12volt mini hair dryers actually blow warm air instead of hot, and will help dry the dew that has formed. You can hear them running at star parties when you have a "wet" night. The downside is that they really use a lot power, which can be an important factor when observing at remote locations. Also, they are only a temporary solution. The dew will return once the optics cool down, and you'll once again have to use the blower.
One of the more effective, active methods used to combat dew is to continually warm the optics with heater strips to keep them a degree or two above the ambient temperature. Applying too much heat would probably distort the images seen through the telescope. These type of "heaters" are basically resistor elements that heat up when you pass electricity through them. They are wrapped around the exposed optics. When placed on the telescope before the start of the observing session, they help to prevent dew from forming during the night. Even a telescope that is already dewed up can have the dew evaporated and kept away by a dew heater strip.
There are a couple of commercial dew zappers available. Orion Telescope and Binocular sells dew zappers for the objectives and corrector plates of telescopes. They have one model that uses 12V DC current and another one that will use 110V AC. Jim Kendrick Studio makes a more complex dew zapper. Not only do they make them for objectives and corrector plates, but Kendrick also makes dew zappers for eyepieces, finder scopes, and just about anything else you can think of. The Kendrick system also has a main controller that will power from 4 to 6 heaters. It also can vary the power it gives to the heaters allowing you to only use the amount of heat needed to keep the dew away. Since the Kendrick system runs off of 12V DC, this helps your battery last longer.
The downside to the commercial units is the price. Heating elements for 8" Schmidt-Cassegrain telescopes cost around $50 while heaters for an eyepiece go for around $35 each. On top of this, the Kendrick controller, although a wonderful device to have, goes for around $70.
If you have the money and only want a heating element for your main objective or corrector plate, then get one from Orion. If you have the money, and need multiple heating elements, then get the Kendrick system. If you don't have the money, or just like building things yourself, you can make some homemade dew heaters from parts obtained at your local electronics shop.
My solution
I wanted multiple heaters and decided that I liked the Kendrick system. I also decided that I didn't want to spend all that money on the entire system up front. My solution was to buy the Kendrick controller and make some homemade heating elements out of resistors purchased from Radio Shack. Resistors are very cheap (50 cents for a package of 5) and although not nearly as durable and flexible as the fiberglass heat strips from Kendrick and Orion, they will still get the job done.
Electronic theory
I'll try to make this section and the associated math as painless as possible. A resistor is an electronic device with the purpose of restricting the flow of electrical current. The resistance value is measured in a unit called the ohm. When a resistor is doing its job, it produces heat. The resistor and the amount of voltage and current determine the amount of heat. Voltage, measured in volts, is the force that pushes current measured in amps, through the electronic circuit. I am going to express the heat in turns of power, which will be measured in watts.
Confused yet? Remember,
Resistance = ohms,
Voltage = volts,
Current = amps,
Power = watts.
Ohm's Law defines the relationship of voltage, current, and resistance:
Voltage = Current * Resistance,
or
Volts = Amps * Ohms.
Power can be determined using the voltage, and either resistance or current. The formula is:
Watts = (Volts * Volts) / Ohms,
or
Watts = Volts * Amps.
Given two variables of the equations, you can always solve for the third. So, to sum it up, here are the equations:
Ohms = (Volts * Volts) / Watts,
Amps = Watts / Volts,
Volts = Amps * Ohms
Watts = (Volts * Volts) / Ohms,
Watts = Volts * Amps.
All that is left now is knowing how to figure the resistance. One resistor is easy because it is just the value of that lone resistor. In building the heater, you will use many resistors so you can spread the heat out evenly and not have any hot spots on the optics. There are two ways to connect resistors together. One way is in a sequential chain, connecting them end to end. This is described as connected in series. Here is an example:
![]()
When resistors are connected in series, their total value is just the sum of each resistor added together. So, if you had seven resistors in series, and each resistor had a value of 10 ohms, the total resistance would be 70 ohms.

The second way of connecting resistors is called parallel. This is when both ends of a resistor are connected to both ends of the next resistor. Here is an example:
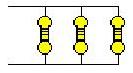
When resistors are connected in parallel, calculating the total resistance is just a little more complicated. If R is total resistance measured in ohms, then the total resistance of resistors in parallel can be measured by the following formula:
1/R = 1/r1 + 1/r2 + 1/r3 + …
where r1, r2, and r3 represent the resistor values. If you happen to be using resistors with the same value (as most people do) you can just divide the resistor value by the number of resistors you have. If your resistors have different resistance values, then you need to stick with the above formula. So, if you had seven resistors in parallel, and each resistor had a value of 490 ohms, then the total resistance would be 70 ohms (i.e 490/7=70, or 1/R = 1/490 + 1/490 + 1/490 + 1/490 + 1/490 + 1/490 + 1/490, which gets R=70).
Whether you design a heater based on resistors in series or in parallel or even a combination of the two is totally up to you. It all depends on what type of heater you want to make and getting the desired total resistance value out of the resistors available. I'll detail my choices and reasoning below.
Let's run the numbers
Okay, let's make some decisions and run through the numbers with some real world examples. The first question to answer is "what is your power source?" More than likely it will be a 12-volt battery, either stand-alone or your car battery. If you are using the Kendrick controller like I am, then it will have to be 12 volts.
Secondly, you have to determine how much heat you want to produce. This will be expressed in terms of power, which is a watt. Wattage needed is a little more subjective. If you have relatively little dew, then you can get by on less power. If you live in a place that has heavy dew, like I do in North Carolina, then you will need more power to keep the optics warm. The bigger the optic is that you want to keep warm, the more power you will need. There is an article on Sky & Telescope's web site concerning this very topic. They suggest 1.5 watts for heating eyepieces and 3.00 watts for heating an 8" corrector plate. To throw a little confusion into the decision process, the Kendrick heaters have higher power ratings. Their eyepiece heaters are around 2.2 watts and their 8" corrector plate heater is about 19 watts! Two considerations with the Kendrick heaters are that they are bigger fiberglass strips, so the heat is spread out more, and Kendrick says that you will probably not need to run these at full power. Your decision will also be based on how many resistors you use. The more resistors you have, the more power you'll need because that heat will be spread out more. Since I have heavy dew in my region, and I was using a Kendrick controller, I decided to fabricate my heaters with the numbers that were closer to the Kendrick numbers, though a bit more conservative. I didn't want to get too hot because I would be wasting power and I didn't want to risk damaging the finish on my equipment. For this article, I'm only discussing an eyepiece heater. I decided to make mine at right around 2 watts. This meant that I needed right around 70 ohms of resistance. These numbers are approximations to keep it simple.
I decided to make my heaters with between 5 and 7 resistors. As you can see from the examples above, if I used 7 resistors in series, they need to be 10 ohms each to give me the total desired resistance of 70 ohms (which gives me the power rating of about 2 watts). For a circuit in parallel, you would need 7 resistors that are 490 ohms each to get a total resistance of 70 ohms. Which do you use, series or parallel? My decision was based on available resistors, ease of construction, my soldering skills, and my patience. I choose to make my heaters out of resistors in series because they are easier and quicker for me to solder. The down side is that I have a single narrow heater so the heat is not as spread out. Also, it will probably be more prone to breaking if it is flexed too much. Another down side is the method of attaching the heater to the eyepiece. With a wider band, made out of resistors in parallel, it would probably be easier to attach some Velcro for fastening. Given the downsides, I still choose the series route and made some elastic bands for attaching my heaters to the eyepieces. I have found that the elastic bands never get used, so I wouldn't worry about making any if I did it again.
So let's finally run the numbers. In my system, I have a 12 volt power supply. I decided on a power rating of about 2 watts. Using the formula,
Ohms = (Volts * Volts) / Watts,
I get
Ohms = (12 * 12) / 2 = 144 / 2 = 72 ohms.
So, I used 7 resistors that were 10 ohms each to get a total resistance of 70 ohms. In some cases I only used 5 or 6 resistors. I also varied the resistance, which means the power is different, which also means the heat is different. But I basically stayed between the 70 and 80 ohm range. Resistors are cheap enough that you can experiment with them.
One more thing to consider about resistors is the power rating. You'll see that they are rated as 1/8, ½, 1, etc. watt resistors. This rating is what the resistor can handle without being damaged. Say for example, you had a 3-resistor circuit that was producing 3 watts. Each resistor would have to be capable of handling 1/3 of the total wattage. They would need to be rated at least at 1 watt. In my heater circuits I am using a lower wattage plus more resistors. You can figure it out, but I decided to just use resistors rated at ½ watt since they seemed to be the most common at Radio Shack and they are well within the safety range.
Let's build a heater
First of all, the parts list:
Resistors
Solder
Soldering iron
Wire
Pliers/wire cutters
Heat shrink tubing
RCA plug or Cigarette lighter plug
I started out by building a "chain" of resistors. I cut and bent little loops into the end of each resistor. See the example:
![]()
Each time I added a resistor, I closed off the loop, making a nice little chain. This made it easier to keep the resistors together and it made it a lot easier to apply the solder. I also think it helps strengthen the chain because you have a combination of the wires plus the solder helping to hold it together. I'm not sure how I would approach this if I were connecting the resistors in parallel. I'm sure a similar method could be used.
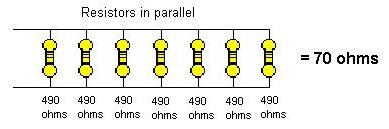
I used a device called "Helping Hands" that I got at Radio Shack to hold the chain of resistors. This device is like a little workbench that has a couple of alligator clips to hold things. With the string of resistors stretched between the clips, I just went from one link to the next applying the solder. The little loops worked quite well at spreading out the solder for a good, strong, secure connection.
 Here is a picture of the "Helping Hands" holding a "chain" of
resistors.
Here is a picture of the "Helping Hands" holding a "chain" of
resistors.
I then cut a length of wire for my heater. The two-element wire (like a typical electrical cord) has to be long enough to reach from the optic being heated to the power source. I made mine 7 feet in length. I split a 6" section of the end of the wire in half to separate the two elements. I then stripped off enough plastic from one end of the strip to attach and solder it to one end of my resistor chain.
I then slid a length of heat shrink tubing over the resistor chain and down a ways over the connected wire. Heat shrink tubing is used to protect the heater from short circuits, make the system look nicer, and also offer some protection between the heater and whatever surface you use it on. The tubing comes in a variety of colors but I used black. White might be good for using it in the dark and I'll consider this color the next time I make a heater. As the name implies, heat shrink tubing will shrink when heat is applied to it. Make sure you slide it far enough down that any soldering you do does not cause it to shrink before you are ready. On my first heater I didn't think about this and had to cut off a small section that shrunk down too small.
After the heat shrink tubing is slid far enough down, solder the other end of the wire that was split onto the other end of the resistor chain. Then center the heat shrink tubing over the resistors and shrink it with a very hot hair dryer or you can carefully use a candle flame. I actually used the heat from the resistors themselves, but you have to apply power to them (which means you would shrink the tubing as your last step).
Next I split a small length of the other end of the wire and attached my RCA plug. I used an RCA plug because that is what the Kendrick controller uses. If you were using a cigarette lighter receptacle like in your car, you would need to attach a cigarette lighter plug. Likewise, you could also directly attach the wires to your 12-volt battery. Polarity is not important so you don't have to worry about the positive and negative terminals.
The next step is to power up the heater. My 70-ohm, 7-resistor heater actually gets quite hot to the touch. And as I mentioned above, this helped to shrink down the heat shrink tubing. If you don't feel any warmth from your heater then there is a break somewhere in the circuit. Check all your connections.
Using the heater and fighting dew
All that is left now is to actually use the heater. Put the heaters onto the optics at the beginning of the observing session. It's easier to prevent the dew than to get rid of it once it has formed. Just carefully wrap it around the optics that you want to keep heated, such as an eyepiece or the objective of a finder scope. If you fashioned your heater with the resistors in parallel, then it might be wide enough to attach some Velcro to. Velcro would make it easier to attach to the optics. Since my heaters were created with resistors in series, the heaters are narrow strips. As I've mentioned before, I made some little elastic bands to slip over and hold the heaters, but I have found that I don't need to use them.
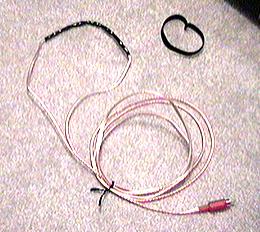 Here is a picture of the heater (notice the RCA plug at the
end), along with the elastic band.
Here is a picture of the heater (notice the RCA plug at the
end), along with the elastic band.
Since resistors and solder are not made to be flexible, you have to make sure that you don't bend them too much. If they bend back and forth too many times they will eventually break. I shaped my heaters into loops by wrapping them around the optics. Given the length, then looped the optics about 1.5 to 2 times. The rigidity of my design means they hold their shape after I remove them. I left them in this shape so that now when I use them I just slide them over the optics (i.e. eyepieces). Leaving them in this shape helps to minimize the flexing and hopefully make them last longer.
Do you want to know how much battery power it takes to run the heater? Use the formula for figuring the current:
Amps = Watts / Volts,
Divide the amp hour rating of your battery by the current needed to run the heaters. If for example, the current of the heaters is 2 amps, and they are being used on a 12 amp hour battery, then the battery will last for 6 hours.
Is it worth the hassle? Well for my eyepiece heaters it certainly was. On a serious observing night that has dew, I use 5 of these heaters. I use 3 on my eyepieces and 2 on my 8x50 finder scope. They were easy to make and only cost me a few bucks in materials. Had I bought commercial units, it would have cost me over $250!. Some people have made their own heaters for 8" and larger SCT corrector plates. And the most common conclusion was that if you are soldering resistors to make a heater this large, it really isn't worth it. For around $50 you could just buy a commercial unit that is more flexible and easier to use, and ready to go out of the box.
Whether you are trying to save a few bucks like me or just like to do things yourself, I hope this article was informative and you were able to put it to good use. For just a few dollars I was able to create a nice array of heaters to deal with the dew and keep me observing for as long as I desire.
Observations on using my heaters
I LOVE my dew heaters. They work perfectly. My typical setup is to keep there eyepieces on my tripod for observing. I switch out between low, medium, and high powers. That means they are exposed to the night air all night. So I use 3 heaters for my eyepieces, a couple of heaters for my finder scope, and a commercial heater for my corrector plate. My homemade dew heaters work great.
Dew heater for a Telrad Reflex sight
The Telrad Reflex sight is a very popular finder device. I have one on my Newtonian reflector. But the exposed glass plate is very prone to dewing up. I tried a commercial dew shield but found it just didn't work well at preventing the dew. So I decided to actively heat the glass with a resistor. I placed a 100ohm resistor under the glass. I basically did the same thing as this fellow did:
http://www.simcoeskies.com/dew/no_can_dew_7.html
The only difference is that I put black heat shrink tubing on the resistor so that it blends in, and I installed a female RCA receptacle in the side of the Telrad. I made a wire with two RCA plugs (one on each end) to connect the Telrad to a power source for heating the resistor. Works very well.