Building a LED
Flashlight
by Jeff Polston (October 13, 1997, updated: October 5, 2016)
Astronomers crave those pitch black skies. They'll even drive, hike, or climb
the tallest mountain to obtain them. They rave about that super dark rural
site, where you can't even see your hand in front of your face. The first
thing they do upon arrival is grab a flashlight so they can see!!!
Let's face it, no matter how great a dark site is, you'll still need light.
You've got to see how to operate your telescope. You've got to see your eyepieces
so you'll know which one to pick up. And, you've got to be able to see your
star chart. A normal white light flashlight is out of the question because
it will destroy your night vision. What you need is some sort of red light
to help preserve your precious night vision.
Most of us started out with a flashlight with some sort of red lens over
the front of it. I still carry around my Mini-Mag flashlight with a red plastic
lens cover. I have a headband to mount it in (for that Borg look) and I have
an accessory attached to the end of it so that I can hold it in my teeth.
But, a red light-emitting diode (LED) is much better to use for astronomy.
It has a deeper, more pure red color, which helps to better preserve your
night vision.
There are now quite a few of these flashlights on the market. You can get
them in the standard flashlight look. These seem to be your basic flashlight
but they have an LED in place of the incandescent bulb. You can buy weird
looking devices with adjustable "goose necks". For a couple of bucks you
can buy a tiny LED light for your key chain. My favorite light is one called
Starlite, which is made by
Rigel Systems
(click here to visit their web site). This is a small, box shaped flashlight
that has two, super bright LEDs and a thumb wheel for adjusting the brightness.
If you don't favor purchasing a commercial unit, whether it be to save a
few bucks or religious reasons, you can also fashion your own little LED
flashlight out of parts found at your local electronics store (like Radio
Shack). They are very simple devices to make and you can customize it to
your heart's delight.
About the only thing different with a LED is that it can't generally be hooked
up directly to a battery. It needs to be wired in series with a resistor.
The resistance needed can be easily calculated with the following formula:
R = (Vbattery
- Vled) / (Iled),
where R is the resistance in ohms,
Vbattery is the voltage of your
battery or battery pack,
Vled is the LED's "forward voltage",
and Iled is the "forward current"
of the LED. The forward voltage and the forward current can be found
on the LED package. The longer of the two wires from the LED should be connected
to the positive lead from the battery. If you wire it the other way around,
the LED will not work.
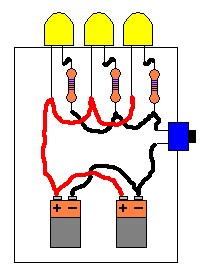
 Here's
a simple drawing showing the circuit. The battery (light blue) is at
the bottom, the switch (blue) is on the right, the LED (red) is at the top,
and the resistor (yellow) is on the left. Notice that the long lead
of the LED is wired through the resistor to the positive terminal of the
battery.
Here's
a simple drawing showing the circuit. The battery (light blue) is at
the bottom, the switch (blue) is on the right, the LED (red) is at the top,
and the resistor (yellow) is on the left. Notice that the long lead
of the LED is wired through the resistor to the positive terminal of the
battery.
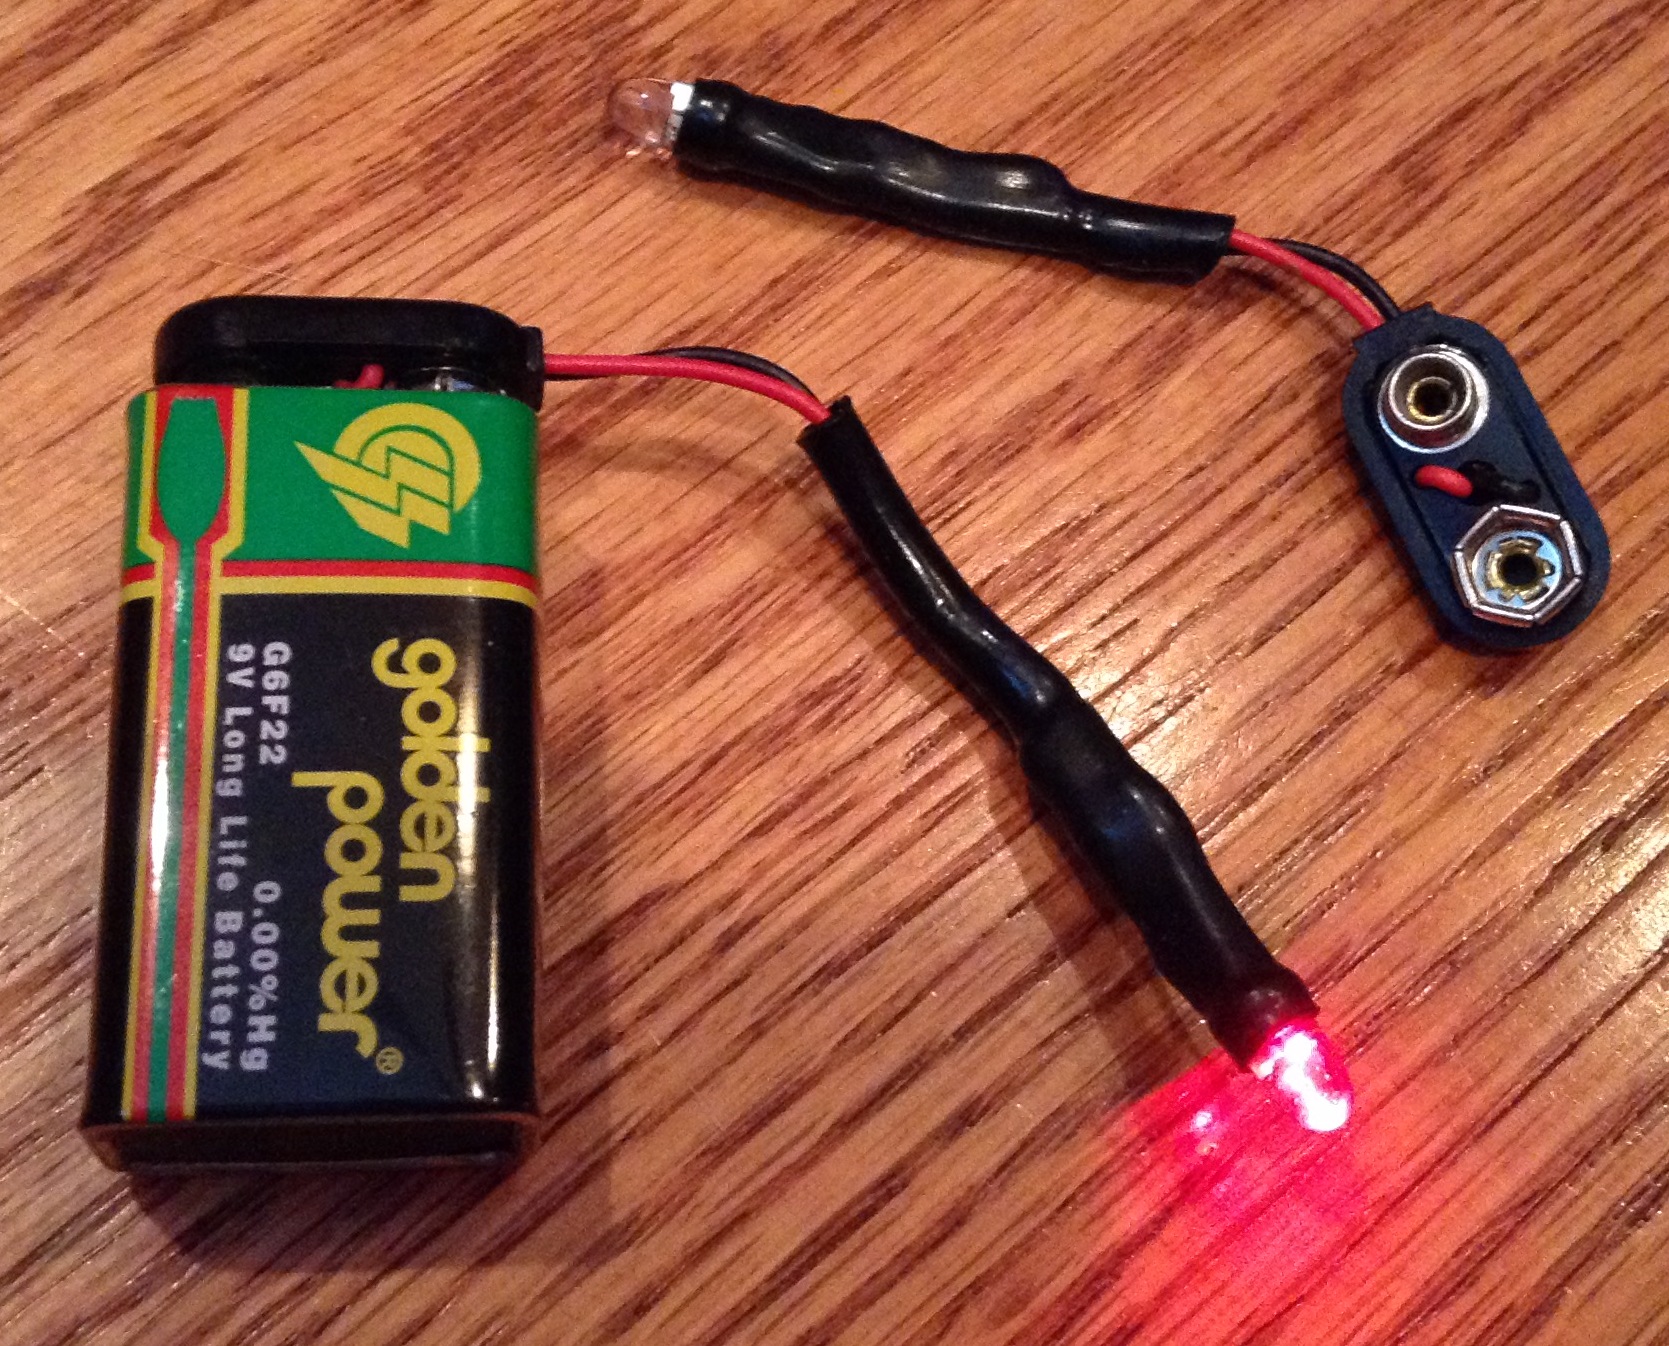
A calculation example is the Archer Jumbo Super-Bright LED from Radio Shack.
According to the package, it has a forward voltage of 1.85 volts. The forward
current is 20 milliamps (0.02 amps). If you were using a 9 volt battery,
you would need a resistance of:
R = (9 - 1.85) /
(0.02) = 357.5 ohms
The resistance doesn't have to be exact. Just get something in this range.
I used ¼ watt resistors in my project. If you want variable brightness,
just wire a 1000 or 5000 ohm potentiometer in series with the LED and resistor.
If you want a wide, diffuse glow from the LED then roughen up the lens a
little. You can use sandpaper. You can enclose these components in a Radio
Shack project box or build something yourself.
My Project
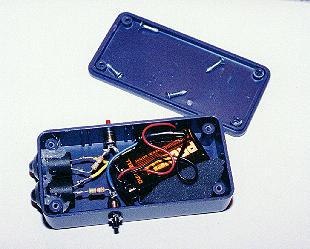 Here's
an image of the inside of my home built LED light. I used the a project box
sold by Radio Shack. I also bought the brightest red LED and the brightest
orange LED from Radio Shack. You don't really need two, but I was just having
fun with the project. I also got two LED holders to try and make the
flashlight look professional. Unfortunately, as you can see by the
gobs of hot glue, I drilled the holes too big for the LED holders. Always
have the proper size drill bits!!! :)
Here's
an image of the inside of my home built LED light. I used the a project box
sold by Radio Shack. I also bought the brightest red LED and the brightest
orange LED from Radio Shack. You don't really need two, but I was just having
fun with the project. I also got two LED holders to try and make the
flashlight look professional. Unfortunately, as you can see by the
gobs of hot glue, I drilled the holes too big for the LED holders. Always
have the proper size drill bits!!! :)
Anyway, I put two LEDs in my flashlight. I figured the brighter orange
LED would be for finding my way around, and the slightly dimmer red LED would
be for reading charts. I was trying to make this light kind of simple
(despite the two LED approach) so I didn't use a potentiometer. Each
LED (with its calculated resistor) is attached to a momentary switch on the
side of the box. Most would probably prefer to have on/off switches, but
I also let my baby daughter play with the light (hence the need for it not
to stay on all the time).
My LED light works pretty well. I have used it on several observing
sessions already. To make it an all purpose light, I have been thinking
about adding a white light to it. I would like to use a white LED but
the only company that I could find them at wanted too much money. I
might add an incandescent bulb at a later date when I figure out a good way
to do it. For now, both my daughter and I enjoy this neat little
flashlight.
Update: 02/05/04
Multiple LEDs and Batteries
This article has generated enough email to cause me to add this updated section.
It seems that everyone loves the idea of building their own LED flashlight,
but they want to add more LEDs and batteries and want advice on hooking them
up and figuring out the correct values for the formulas. Since I'm
not an electronics expert, I always have to think and brainstorm a little
to figure it out. So hopefully this update will help those of you who
want to go beyond my simple LED flashlight design.
First of all, for a brighter LED light (whether it be red for night vision
or white for just common use), you add more LEDs. Of course the more
LEDs you add, the more current it will need, so the quicker your battery
will run down. For a brighter, longer lasting flashlight, you might
consider more LEDs with more batteries.
Batteries
Batteries in normal flashlights are typically arranged in a series circuit.
In other words, they are end to end. Just think about a 3 or
4 cell flashlight. All the batteries are lined up, with the positive
terminal of one battery connected to the negative terminal of the next battery.
When they are hooked up this way, you add the voltage of each battery
to get the total voltage of the circuit. If you have three AA batteries
(which are 1.5 volts each), your total voltage would be 4.5 volts (i.e. Total
voltage = 1.5 + 1.5 + 1.5 = 4.5).
If you hook up the batteries in parallel, with the positive terminal of one
connected to the positive terminal of another (and the negative terminals
connected to each other), your total voltage stays the same. If you
connected two 9v batteries together in parallel, the total voltage would
still be 9v. But now you would have a system that can product more
current, or in other words power the LEDs longer.
The choice is up to you. If you're connecting everything yourself,
you can do it about anyway possible. But since I favor pre-made battery
holders and connectors such as those from Radio Shack, I'd probably hook
up multiple AA or AAA batteries in series with a battery holder, and I'd
probably hook up multiple 9v batteries in parallel with a battery connector
and wire. Sometimes you use a certain battery type and configuration
because of space limitations in your device. I personally like dealing
with 9v batteries because they are compact and you only need a small snap-on
connector. Plus it seems pretty trivial to add a second 9v battery
in parallel to get a longer lasting light. Use whatever battery you
want for whatever reason, be it size, convenience, price, etc.
LEDs
As I've already mentioned, if you want a brighter light, you put more LEDs
in it. Just pick your color and if you want it bright, buy the brightest
ones they offer. Oh by the way, you can now buy white LEDs pretty cheap
at places like Radio Shack. When I wrote my original article above,
you could only order them from a few select companies and they were very
costly. As for hooking them up, I suggest you hook them up in parallel,
with a resistor for each LED (as opposed to one resistor for the entire circuit).
Although this is more work, the reasoning behind this is that if one
LED happens to go bad, it won't affect the other LEDs as much. If you
only had one resistor for the entire circuit and one LED went bad, that would
mean that the other LEDs are now running on more current and if they can't
handle it, they will fail prematurely. And if that bad LED actually
fused into a short, a single resistor circuit wouldn't even power the other
LEDs now because all the power is going through that fused LED. Of
course you may deem the chances of something going bad remote enough not
to deal with the hassle of extra resistors. That's logical thinking
and to be honest, I'm not sure I wouldn't follow that path myself. I
just want to point out that the more secure design would probably be a parallel
circuit, especially if you are putting a lot of work into it and plan on
really depending on it a lot.
Calculations
Okay, you know the voltage of your batteries. If they are in series,
add them up. If they are in parallel, the voltage is the value of one
of the batteries (assuming the batteries all have the same voltage).
Case 1: array of parallel LEDS, with one resistor
for entire circuit
If you just want to use one resistor before the array of parallel LEDs, use
the same formula given above (i.e. R = (Vbattery -
Vled) / (Iled) ) and just add up the
total current for the LEDs. In my example, I was using a single LED
with a current of .02 amps. If I hooked up 5 of these in parallel,
the total current through the entire array of LEDs would be .1 amp. In
my example of a 9v battery and a single LED having a forward voltage of 1.85v,
the resistor value needed was 357.5 ohms. If I hooked up 5 of these
LEDs in parallel, then the single resistor needed would be 71.5 ohms. (i.e.
(9 - 1.85 ) / .1 ). Notice that I'm using the forward voltage value from
just one LED. Of course with more LEDs, the more current you are drawing,
so you'll need a resistor that can handle it (i.e. higher wattage). But
with small LEDs for flashlights and stuff, it ain't that big of a deal.
Case 2: array of parallel LEDS, with a resistor
for each LED (recommended)
In this case you just use the formula as if the LED was a stand alone circuit.
You use voltage and current values for the LED in question. So
if you hooked up a parallel array of any number of LEDs, just use the value
of each LED to figure out what resistor to use with it. With my example
of a LED with a current of .02 amps and a forward voltage of 1.85v, the
corresponding resistor to use with a 9v battery would be 357.5 ohms (i.e.
R = (Vbattery - Vled) / (Iled), so R = (9 -
1.85) / .02 = 357.5 ohms). Another reason I recommend this is if you
decide to use different value LEDs for some reason, the resistor is specific
for the LED it is paired with. In other words, it makes it easier to
actually have different types of LEDs if you so desire.
 Here's
a simple drawing showing three LEDs in parallel, with two batteries in parallel.
Here's
a simple drawing showing three LEDs in parallel, with two batteries in parallel.
Case 3: LEDs in series
In the case of the LEDs being in series, just add everything up. The
total voltage and current of the LEDs would be their cumulative sum. So
in my example, if you have three LEDs with a current of .02 amps and a forward
voltage of 1.85v, the corresponding single resistor to use with a 9v battery
would be 57.5 ohms (i.e. R = (Vbattery - Vled) /
(Iled), so R = (9 - (1.85 + 1.85 + 1.85) / (.02 + .02 + .02)
= 57.5 ohms ).
Conclusion
Hope all of this makes sense. I've tried to incorporate solutions for
all the questions I have received on my original article. Someone once
asked me about making the LEDs flash. Well, you can buy flashing LEDs
from Radio Shack too.
Here's some flashing LEDs that I use to mark the feet of my tripod, or cables on
the ground, to keep from tripping over them in the dark.
I've also recently converted the lights in my
camper to LED lights, but I bought commercial units instead of building them
myself. I converted to LEDs to help conserve the battery when I'm camping
away from power hookups. The reason I bought commercial units, which
consisted of 19 LEDs in a bulb housing that would fit my camper sockets, is
because the price has finally come down far enough for me to be willing to buy
them rather than try to make them. The reason I'm saying this is because if you
are strictly building a multiple LED light yourself to save money, check the
commercial alternatives again because they might be low enough in cost now.
The last time I checked, I'd rather just buy a commercial one that has all I
need instead of trying to build my own.
Of course, building your own LED light can be fun and rewarding. You
can custom build it to suit your needs. And it's neat to show someone your
own handiwork. Good luck with all your projects!
* Back to home page *