JeffPo's Polar Alignment Page
Last update: 04/25/03
Latest update: 09/18/19
If you have an equatorial mounted telescope, there are three reasons that you might want to have it polar aligned. The first is that you want to view an object "hands free". That is, you don't want to have to keep moving the telescope to keep the object in the field of view. This is extremely helpful when you are observing at high powers such as planetary work. It also comes in handy when you are showing objects to other people. With a polar aligned scope, you don't have to keep re-centering the object before each person takes a look. Of course, the assumption here is that the telescope also has a right ascension motor. Even without the RA motor, polar alignment helps in that you only have to worry about one axis for adjustments.
The second reason for having a polar aligned telescope is so that you can take advantage of the setting circles. Each object in the sky is defined by a set of coordinates on the celestial sphere. With a polar aligned scope you just look up the coordinates of the object you want to view, "dial" in the correct RA and Declination, and then you'll scope will be pointing in the right direction.
The third reason for polar alignment is astrophotography. With the long exposures required in photographing the night sky, you need to counteract the revolution of the Earth. The RA motor on your mount basically "freezes" the sky in place so you can record the image without trailing.
These three reasons also have varying levels of accuracy needed for the polar alignment. For just visual work, pointing your scope's polar axis at Polaris (the North Star) may suffice. Polaris is about 44 arc minutes away from the true celestial pole. If you want to use your setting circles, you may want to be a little more accurate in your alignment. If you are off by too much, the object will not be in your field of view when you "dial" it in. For astrophotography, you want perfect polar alignment or as close to it as you can get. Any errors in alignment will show as blurred images in your pictures.
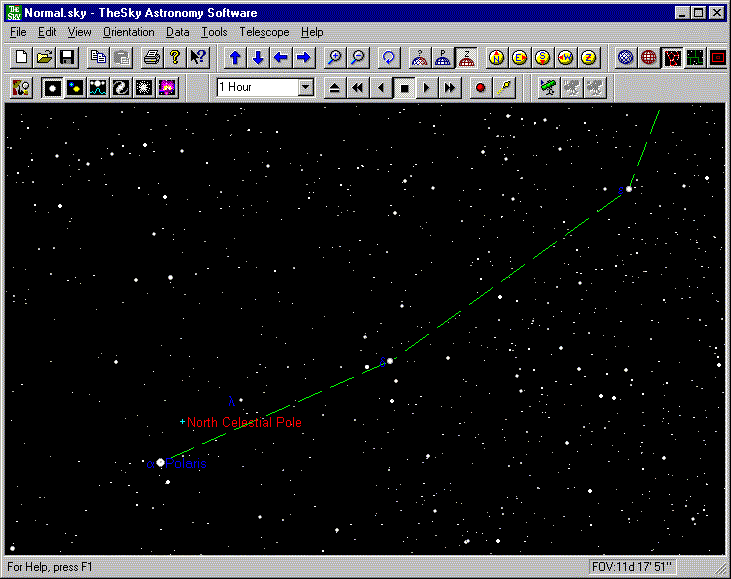
You can actually get quite close to being polar aligned by guessing at the amount of Polaris' offset when using your finder scope. I use to use this method all the time, with great results. I aligned the finder scope as best I can with the telescope. Then I move the scope until it reads 90 degrees declination. Using a star chart similar to the one below, I move my entire mount in azimuth and/or altitude until I think I've got it polar aligned (i.e. the crosshairs in the finder scope are pointed at where I think the north celestial pole is located).
Some companies sell tools to help you polar align. Some, such as Orion and Celestron, have an illuminated polar reticle in their finder scopes (Meade use to sell these). Along with the regular crosshairs, you have a circular grid that is divided up into 24 sections (for the 24 hours in a day), as illustrated in the image below:
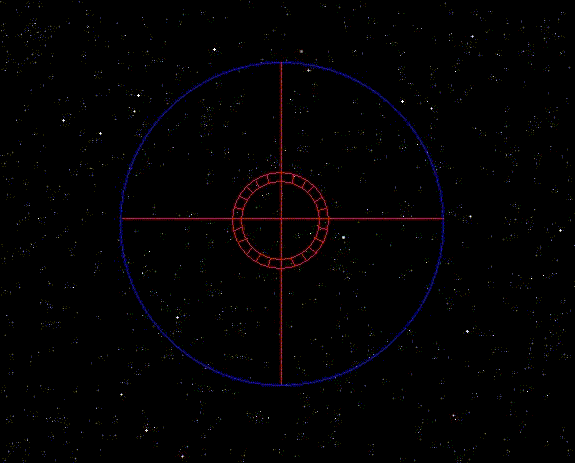 This
grid is offset by the approximately 44 minutes that Polaris is offset from
the true celestial pole. You use a paper calculator to determine which of
the sections to place Polaris in. I have an Orion 8x50 illuminated
polar alignment finderscope. Most of the time this is all I use to
do my observing. It gets my polar alignment close enough that my manual
setting circles work quite well at placing the object in the field of view
of a low powered eyepiece (sometimes a medium power eyepiece).
This
grid is offset by the approximately 44 minutes that Polaris is offset from
the true celestial pole. You use a paper calculator to determine which of
the sections to place Polaris in. I have an Orion 8x50 illuminated
polar alignment finderscope. Most of the time this is all I use to
do my observing. It gets my polar alignment close enough that my manual
setting circles work quite well at placing the object in the field of view
of a low powered eyepiece (sometimes a medium power eyepiece).
There are other devices as well that attach to the forks or wedges of Schmidt-Cassegrain telescopes. Some German equatorial mounts come with polar alignment scopes built into the polar axis. If none of these tools are at your disposal, then the drift method below can definitely help you attain good polar alignment. Just remember that the drift method is kind of overkill for casual observing. The drift method is more geared toward photography.
Drift Method of Polar Alignment
NOTE: This is a more technical explanation of the drift method. I have a simplified version below this one, that is specifically for Schmidt-Cassegrain or refractor telescopes using a right angle diagonal.
For precise polar alignment, most people agree that the "declination drift method" is the most accurate. These instructions are for aligning a Schmidt-Cassegrain or refractor telescope with a right angle diagonal being used (i.e. mirror images). I will also note what to do for a Newtonian telescope (i.e. inverted images). Just remember which way is North and South (which corresponds to Up and Down with a mirror image) in your particular telescope. Also note that you don't have to be picky when selecting the stars. I use to think I had to find a star in the sky and then point my telescope at it. This became frustrating when I didn't see a bright star near the position I wanted. To keep matters simple, just point the telescope in the right direction. More than likely, there will be plenty of stars in the eyepiece to use. If not, a little panning around will certainly find one. The star doesn't have to be very bright. It just has to be bright enough to see and use. Also, "up" and "down" are relative terms. If the scope is on its side, looking at a star on the horizon, up and down seem more like left and right. Remember that up and down in the telescope eyepiece is defined by the declination movement. Turn your declination slow motion control and note which way the star moves. That's up and down. Or you can always cock your head sideways to match the telescope.
1) Set up the telescope and get it as close as you can to polar alignment. You can simply point toward Polaris or one of the above methods to get a little closer. The closer you get initially, the shorter the time you will spend doing the drift method. Also, make sure your tripod is as level as possible.
2) With your diagonal and illuminated guiding eyepiece in the telescope, rotate the eyepiece so that stars will move parallel to the crosshairs in Right Ascension (RA) and Declination (DEC) when using the slow motion controls. Align it such that the DEC is up and down (North and South) and RA is right and left (East and West).
3) Now find a star along the meridian (the north-south line overhead) and somewhat above the celestial equator (about +20 degrees declination). Center it in the guiding eyepiece and let the scope track. Watch for DEC drift (up or down). You should see some drift within about 5 to 30 seconds unless your scope is very close to being aligned.
4) If the star drifts UP (NORTH), then your polar axis is set too far WEST. Turn the azimuth knob that moves the star RIGHT in the field of view. These "adjustments" are reversed for a Newtonian.
If the star drifts DOWN (SOUTH), then your polar axis is set too far EAST. Turn the azimuth knob that moves the star LEFT in the field of view. These "adjustments" are reversed for a Newtonian.
Repeat these adjustments until you don't see any drift in about 5 minutes.
5) Now find a star that is on the celestial equator and low in the eastern sky (within about 15 degrees altitude). Center it in the guiding eyepiece and let the scope track. Watch for DEC drift (up or down). You should see some drift within about 5 to 30 seconds unless your scope is very close to being aligned.
6) If the star drifts UP (NORTH), then your polar axis is set too HIGH. Turn the altitude knob that moves the star DOWN in the field of view. These "adjustments" are reversed for a Newtonian.
If the star drifts DOWN (SOUTH), then your polar axis is set too LOW. Turn the altitude knob that moves the star UP in the field of view. These "adjustments" are reversed for a Newtonian.
Repeat these adjustments until you don't see any drift in about 5 minutes.
7) If you made a large correction in elevation to the order of several degrees or more, then go back and check the azimuth. When all visible drift is eliminated, the telescope is very accurately aligned.
If you can't find a good star on your eastern horizon for the adjustments in step 6, then you may use a star on the western horizon. Just reverse the HIGH and LOW directions (and corresponding adjustments). For polar alignment in the southern hemisphere, reverse the NORTH and SOUTH directions (and corresponding adjustments).
Drift Alignment
for Schmidt-Cassegrain or refractor with right angle diagonal
using an EASTERN horizon star
1) Point to star along the meridian (the north-south line overhead) and somewhat above the celestial equator (about +10 degrees declination).
If the star drifts UP (north), then your polar axis is set too far west. Turn the AZIMUTH knob that moves the star RIGHT in the field of view.
If the star drifts DOWN (south), then your polar axis is set too far east. Turn the AZIMUTH knob that moves the star LEFT in the field of view.
2) Point to a star that is on the celestial equator and low in the EASTERN sky (within about 15 degrees altitude).
If the star drifts UP (north), then your polar axis is set too high. Turn the ALTITUDE knob that moves the star DOWN in the field of view.
If the star drifts DOWN (south), then your polar axis is set too low. Turn the ALTITUDE knob that moves the star UP in the field of view.
Drift Alignment
for Schmidt-Cassegrain or refractor with right angle diagonal
using a WESTERN horizon star
1) Point to star along the meridian (the north-south line overhead) and somewhat above the celestial equator (about +10 degrees declination).
If the star drifts UP (north), then your polar axis is set too far west. Turn the AZIMUTH knob that moves the star RIGHT in the field of view.
If the star drifts DOWN (south), then your polar axis is set too far east. Turn the AZIMUTH knob that moves the star LEFT in the field of view.
2) Point to a star that is on the celestial equator and low in the WESTERN sky (within about 15 degrees altitude).
If the star drifts UP (north), then your polar axis is set too low. Turn the ALTITUDE knob that moves the star UP in the field of view.
If the star drifts DOWN (south), then your polar axis is set too high. Turn the ALTITUDE knob that moves the star DOWN in the field of view.
Here's an article on polar alignment by Rod Mollise: https://uncle-rods.blogspot.com/2013/01/the-polar-alignment-party.html
In particular, this polar alignment method using the SYNC and GOTO functions of a hand control might be enough for most people:
Hand Paddle Polar Alignment
Need to kick it up at least part of a notch in accuracy and
a big notch in “easy”? Some mount makers, most notably Synta/Celestron and
Losmandy, have been incorporating polar alignment routines into their hand
controls for a while. It works like this: you do a go-to alignment after doing
a “rough in” polar alignment as above, and tell the mount you want to polar
align. It has you select and go-to a star. The mount then points at where the
star should be if polar alignment is perfect. All you’ve got to do then is
center up the star using the mount’s altitude and azimuth adjusters.
The good? This alignment method is quite accurate, at least as accurate as a
polar scope alignment, and often somewhat better. There’s no kneeling down on
the cold hard ground to peer through that consarned polar scope. And, to top it
all off, go-to computer alignment is as useable with a fork-wedge scope as with
a GEM.
The bad? While you have a lot of alignment choices other than Polaris or Sigma, which is a god-send for folks with a blocked northern/southern sky, you can’t really, as Celestron suggests with the name for their polar alignment process, “AllStar,” use any star. To begin with, they recommend against Polaris, and while you can use any other star, theoretically, when you get away from the area near the intersection of the Celestial Equator and the Local Meridian, it becomes a bear to center a star with the alt-az controls. All in all, though, automated polar alignment for go-to mounts is a big advance.
What if you’ve got a go-to, but it ain’t a Celestron or a Losmandy and doesn’t have a polar alignment feature? All is not lost. You can use another accurate computer method that will work with any mount that has a “sync” function in its hand control. This process, “Iterative” alignment, is not as quick as AllStar but is at least as accurate. Its only potential drawback is that you must be able to see Polaris or Sigma.
It seems a little complicated the first time out, but once you’ve done "Iterative" a couple of times, you'll find it is easier than drifting, more accurate than a polar scope, and good enough for all but the very longest imaging integrations. To begin, rough in the polar alignment as always, go-to align the scope (some folks advise a 1-star alignment), and go-to a star. The only criteria for star selection is that it be at least 90-degrees from the pole star in declination.
When you’ve picked and done a go-to to the star, center it up with the hand control and SYNC it. Then, go-to Polaris (or Sigma). Don’t sync here; use the alt-az adjusters to move the star HALF the distance to the center of the eyepiece. Next, go-to the alignment star again, center it with the HC buttons and sync, go back to the pole star and move it half the distance to the center once more. Keep going back and forth till Polaris (Sigma) is dead center after a go-to. When it is, you are done and have a very good alignment.
You are one of my brothers or sisters who take loooong exposures? You, like Rod, stack your “subframes” into a final image, but unlike Unk’s 2 – 5-minute “subs,” yours are half an hour long or longer? If that is you, you need an exact polar alignment to prevent field rotation over lengthy exposures. Yep, you gotta drift align, as in “use the declination drift method of polar alignment.”